
†What you Will Need†
4.75 mm rare earth magnets
3mm rare earth magnets
.2 or .3 mm Plasticard/sheet styrene
GreenStuff
Plastic Glue
Super Glue
Pin vice or Dremel
3 mm Drill bit
Hobby Knife
Patience
††††Typhoon/Landspeeder††††

OK to start off, Cut out and clean up your speeder kit. Once that is done i painted my interior rater than stuff around trying to get all the fiddly bits in the cockpit. Glue the guys down onto the base of the speeder along with the back of the seat's, and then glue the top of the speeder on.


Cut out the doors and trim the hinge off, take out your 4.75 mm magnets and Super Glue them in.
Now get your sides of the speeder and look at the inside of it there should be two little raised areas beside each side of the door, it is there that you want to cut out thin strips of plasticard and "build up" that area (marked in Purple) . First off Dry Fit your doors onto the side so you know how much to raise the column's by. It took me 3 strips on each to get the right height.


It does not matter if they are too thick pieces and are hanging off the side as you just trim them down to original column size anyhow. Now when both Door arcs are built up, measure across the door and cut out a piece so you can stick it across the doorway and onto the plasticarded area. Remember to trim and excess plasticard hanging over as you don't want any interfering with the backseat of the cockpit when you go to glue in the sides.
Now with you magnet's fitted to the doors, dry fit them. then dab some super glue on the end of your magnet and place it behind the plasticarded panel, make sure you do this step while the door is still dryfitted. The two magnets should line up automatically. once set in place chuck some more super glue on the magnet to give a strong hold. I took an extra measure by greenstuffing over the magnet and onto the plasticard.
(i didnt want to be rageing if it fell off while inside the speeder)
Glue the sides in.
And Finish Construction of the rest of it.


††††Tornado††††

Ok, for the Tornado variant you need your 3 mm magnets.
Drill out a hole in the center of the nose as show below.
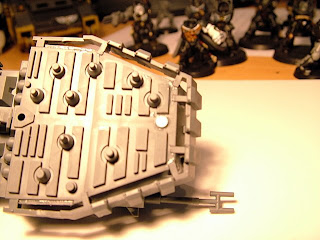
†Make Sure the Polarity is Right in this step. Dry fit and test before gluing†
Take your weapon housing and Drill Out the Middle Glue in your Magnet, and do the same to the back of it.
Drill out a hole in the center of the nose as show below.

†Make Sure the Polarity is Right in this step. Dry fit and test before gluing†
Take your weapon housing and Drill Out the Middle Glue in your Magnet, and do the same to the back of it.

Now all it takes is outfitting the Weapons with magnets, this is Pretty self explanatory and i wont go any further. The most important thing is common sense and always make sure you check the polarity of magnets before gluing anything down.


† And there you have it, hope this is helpful and can also save you some cash during your time in the WH40K hobby


